Design Class: shade

Plan now to beat the heat next summer.

If this summer has left you more hot and bothered than hot and happenin’, then don’t despair.

As the season officially draws to a close it’s a good time to make some observations so you can plan ahead and be prepared for next summer.

While the sun is still high and the days are long, take a good look around the garden and bear in mind the following three questions:

Question 1: what time of day do you plan to use the garden space in question?

Seems obvious huh – the day time. But you mightn’t actually need shade throughout the whole garden from sunup to sundown.

If you’re an early riser who enjoys having your first cuppa and breakfast out in the garden, then it might be most important for you that there is shade then.

If you have young kids at home you’ll also be an early riser (!), but it might be more important that you have some consistent shade throughout the day. That way there’s always somewhere sheltered available for running around, playing with the hose and splashing paint about.

Maybe you have dogs, and you’re out at work all day. It’s also important that they have access to somewhere shady through the hottest part of the day and year.

But if you dream of having sunset drinks without burning out your retinas, then some late afternoon shade might be what is required.

Anyone for Pimms?

Anyone for Pimms?

Question 2: what type of shade do you want?

Again, this might seem obvious, but there are many different types of shade.

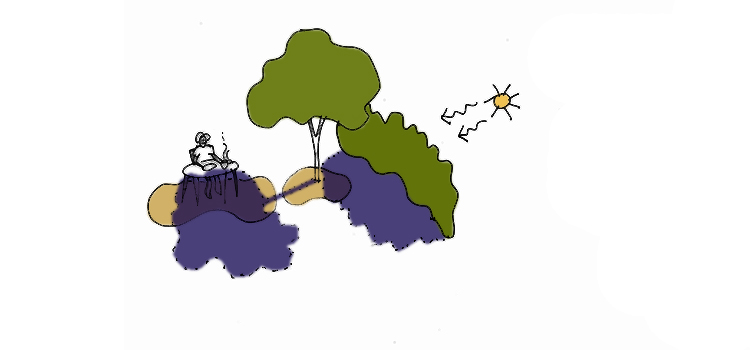
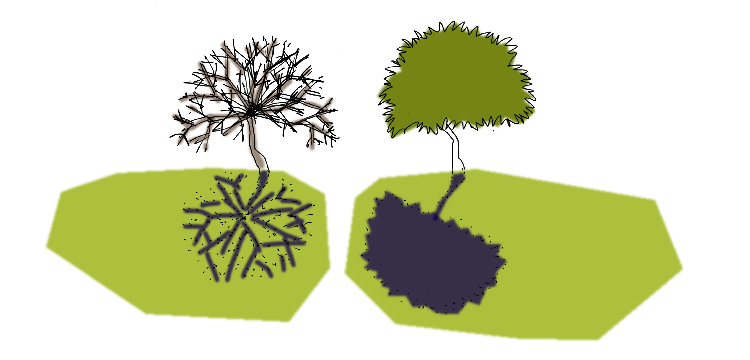
Think of the huge fig trees you see around Brisbane. They create a pool of shade that is deep, dark and noticeably cooler (left below).

Other tree species have a more open canopy and form, and consequently they cast a shadow that is lighter and more fragmented (right below).

Deciduous trees, of course, seasonally change the amount and type of shadow they create. They can be a good choice if you're after summer shade and winter sunlight.

Remember that shadows also change with the seasons. In summer, the sun is higher overhead, so shadows are smaller and closer to the object casting the shadow (left below). In winter the sun is lower in the sky, resulting in shadows that stretch out a long way away from the source (right below). Your neighbour’s palm shadows for example, are close to the trunk in summer, but could be falling over your garden in winter.

Try and think about what type of shadow you’re after, and then consider the ways that could be achieved.

Question 3: how patient are you?

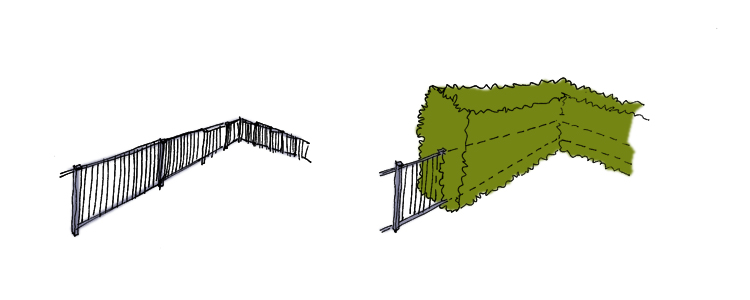
This might seem like a personal question, but it pays to be honest with yourself in order to get a result that fits. The two ways we can create garden shade are through live elements – trees, shrubs, climbers trained over arbors and trellises; and built elements – rooves, shelters, screens and the like.

Unless you can afford to import a mature tree, all plant material will require time to establish in your garden and grow. This is true even if you select the right species for your area and provide optimum growing conditions.

Until the plantings are doing their job, you might have to rely on some temporary shade solutions – maybe some cool umbrellas.

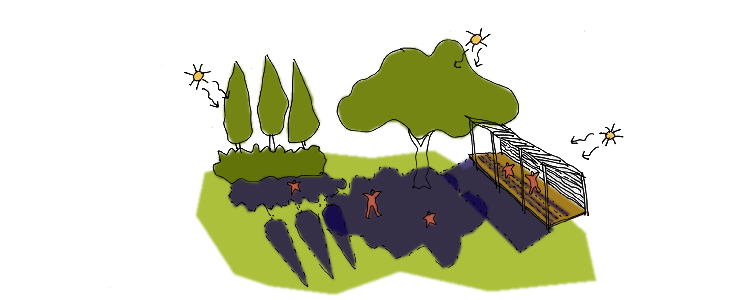
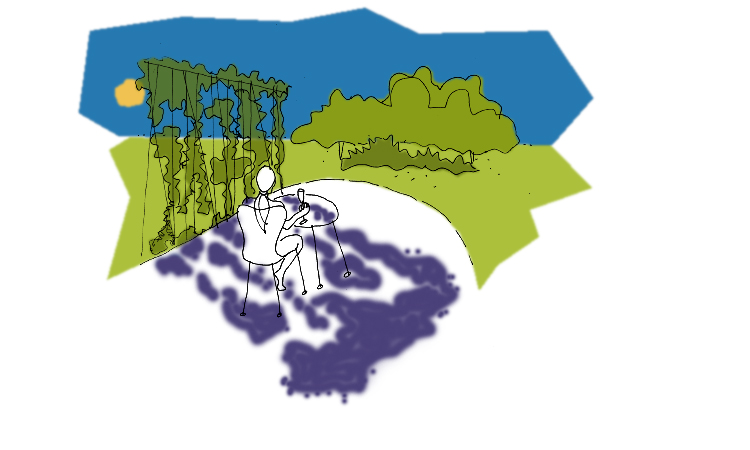
If the thought of waiting 5, 10, or even more years until the vines clamber over the pergola or the tree reaches full height fills you with anxiety, you might need to consider a built solution.

As well as the benefit of shade without the wait, this allows you to complement the architectural detailing of your house. You have to consider all the seasons carefully though, as there aren’t too many deciduous rooves around if you also need winter sun. And of course, structures require maintenance, just like the rest of your house and garden.

Often, a combination of built and growing shade solutions can be tailored to meet your exact conditions and requirements.

Pergola structure with newly planted climbers (left), temporary shading (centre) and fully grown (right).

Pergola structure with newly planted climbers (left), temporary shading (centre) and fully grown (right).

Now it’s over to you.

Did this help you consider some of your garden shade options differently? Feel free to confess if you suspect you’re an ‘instant shade’ person or not, and how you might plan your attack in response.

If you think someone else might benefit from this article, please share it with them. If you liked it, then hit us with a big heart below.

Thanks for reading, and see you soon for more garden, landscape and design stories.

Design Class: pool fences

Four ways to comply with the regulations without feeling like you're behind bars

I am by nature a heat-averse person. Sweating may be fine for the gym, but sizzling in the sun is waaaaay down on my list of fun things to do.

So with our recent bout of balmy (barmy, more like it) weather, I’ve been feeling extreme sympathy for the builders stuck on site finishing my current project. It must be tormenting to have a fabulous new pool sitting right there and not be able to jump in for a quick cool down.

It’s times like this you start to think longingly about pools. Would you get a long pool so you can swim laps? A deep plunge pool? Something clean and crisp and orthogonal? Tiled or not?

With so much to consider, one thing that is often overlooked is the pool fencing. Mandatory for all pools in Queensland, fencing must comply with strict regulations prescribing the height of barriers and prevention of climbing, amongst other things.

Sadly, meeting these requirements and having a good looking pool area often seem like mutually exclusive goals for many pool owners.

If you have an existing pool the fence has to snake its way through and around the existing paving and garden areas.

If you have limited space you often end up with the pool fence jammed right up beside the pool edge, and no space for lounging or sitting beside the pool, right where you want to be.

And the most cost-effective models of pool fencing available can make you feel like you’re sitting inside a jail cell, rather than in your relaxing outdoor living room.

Luckily, if you’re considering installing a new pool there are four tricks for beating the curse of the jailyard pool fence.

1. The Pool Wall Fence

In this scenario you use the wall of the pool itself as the pool fence. The pool sits above the surrounding ground surface, requiring only a small amount of ‘traditional’ fencing to protect the entry to the pool area.

This can be good if you have limited space, as all the area around the pool remains free and useable, with a minimal fenced entry area that can be screened with a wall, or open with a balustrade.

Plans on the left show a pool with conventional perimeter fencing, and then reduced fencing on the right, achieved by raising the pool out of the ground. Sections on the right show how raising the pool enables the pool wall to be used as the pool fe…

Plans on the left show a pool with conventional perimeter fencing, and then reduced fencing on the right, achieved by raising the pool out of the ground. Sections on the right show how raising the pool enables the pool wall to be used as the pool fence and a garden feature.

You can use the outside of the pool wall as a design element in the garden: paint it, tile it, or leave it raw concrete as we've done at our Garland Garden project.

This approach works really well on sloping sites, where you can fence your outdoor living area, and the leave the rest of the pool emerging from the ground as the slope falls away. This type of pool is also crying out for a ‘horizon edge’, where the water cascades over the exposed walls to a catch trough below.

Once inside the fenced area the paved area flows directly into the pool, with nothing interrupting the view. Water flowing over the horizon edge looks great to people viewing the pool at the lower level.

Once inside the fenced area the paved area flows directly into the pool, with nothing interrupting the view. Water flowing over the horizon edge looks great to people viewing the pool at the lower level.

2. The Ha-Ha

This works really well if you have a bit more space to play around with, but it can be used in smaller spaces too.

A ha-ha is a fancy word to describe a sunken area between two pieces of land (OK…a ditch). It creates a barrier without disrupting views across.

In picturesque English gardens ha-has were used to separate the sheep in their fields from the gentry in their pleasure gardens. In contemporary gardens ha-has can be used to comply with pool fencing requirements without looking out at layers of fences.

Using the ha-ha allows continuous access from the pool terrace to the adjacent garden, and enables uninterrupted views across the garden.

Using the ha-ha allows continuous access from the pool terrace to the adjacent garden, and enables uninterrupted views across the garden.

3. The Fancy Fence

Seems obvious in a way, but sometimes we’re so used to seeing conventional pool fences that we forget they don’t have to be made out of glass, or straight lines of aluminium rods.

What about panels with a decorative perforated pattern that can be backlit at night to sparkle? 

Or consider taking your fence on a journey through the garden, like a piece of wandering sculpture. Then you can enjoy some of the lovely parts of your garden whilst still being able to access the pool. This works really well if you have some space to play with.

4. The Green Fence 

This final option uses the bog-standard aluminium pool fence but hides it in the middle of a planted screen. As the plants grow you’re left with a hedge that you can either trim or leave shaggy, whatever best suits your design, but you’ve still achieved your fencing requirements.

Of course, the diagrams above are intended purely to illustrate how the four ideas work, they are not designs or detailed solutions in themselves. Every garden is different, and your particular circumstances must be carefully understood and considered before adopting any of these ideas, to make sure you get the best result to suit your requirements.


Now it’s over to you.

Did this help you consider some of your pool options in a different light? Please let us know your thoughts in the comments below, or share how you’ve re-imagined your pool fencing to create an integrated garden and outdoor living space. If you’re dreaming of a pool, what are your considering?

If you know someone else who might find this interesting, why not share it, and if you liked it ‘heart’ us below.

Thanks for reading and see you soon for more garden, landscape and design stories.


Note: Pool fencing regulations vary across local authorities and states. Make sure to check with your local council for their requirements.

Design Class: 5 more site conditions to look for before designing

In our last Design Class we introduced  5 things to be on the lookout for in your garden or landscape: Orientation, Noise, Privacy, Drainage, and Access and Movement.  Observing how these things work gives a solid foundation to begin design work. This week we're going to add 5 additional things that are helpful to understand.

6.  Gradients and slopes

You’ll know if your block or your garden is sloping.  It’s also useful to know which direction it slopes, where the high points are, and if the slope is even or varied.  

7.  Existing vegetation

What is already there, where is it, and what condition is it in?  You can do this exercise for all vegetation, including trees, shrubs, groundcovers and climbers. Are there plants that change with the seasons, or have distinctive form, foliage, colour, scent, texture or flowers? 

8. Soil conditions

Even without carrying out a pH test you’ll have some idea about the condition of your site soil based on what’s growing successfully in your garden and nearby.  Similarly, looking at building sites or excavations in the area, and chatting to neighbours, is a good way of understanding the basic local geology before your engineer orders a geotechnical investigation. 

9. Services and utilities

Apart from overhead power lines, you mightn’t know exactly where service lines occur, but there are often tell-tale clues to their existence.  Manhole covers in the street or footpath outside your property are a clue to the presence of underground services.  Drains and pits often signify underground stormwater or sewer services.

10.  Special highlights

Are there any treasured parts of the garden that either work really well now, or have great personal value, such as a plant grown from one in your mother’s garden, a beautiful architectural element, or a favourite piece of sculpture?  

In future posts we will start looking at different ways you could respond to the findings of your site analysis. This is where it gets interesting, as two people might agree that a site has the same characteristics, but feel that different responses are required. That's where design comes in!

Now it’s over to you.

Has this exercise encouraged you to look at familiar scenes in a new way? It's only natural that if you find delight in chasing sunny spots in your garden, you may not have even noticed that some of the access points are a bit awkward, or that some garden areas don't drain very well.

Let me know in the comments section.

Of course, if you found this interesting and useful, why not double the fun and share it with a friend. 

Design Class: make analysis your friend

Have you ever had a designer ask if you’ve done any analysis?

Has it given you pause for concern, wondering if the headscarf and Jackie O sunnies you’ve been wearing to your therapy appointments are not proving such a great disguise after all? 

Fear not.

The type of analysis we’re talking about will leave your darkest thoughts blissfully unprodded, whilst helping you clearly and methodically understand what’s going on in your own back yard.

Site Analysis

A site analysis is best undertaken before starting any design work. Your designer should carry out her own analysis, based on research and observations on site.

You’re carrying out your own site analysis when you notice things that occur at different parts of the garden, at different times of day or year.  All of these observations can be compiled onto one or more site analysis diagrams.  We'll start with a simple plan that shows the location of your house on its site: 

Here are 5 things to consider when analysing your site: 

1.  Orientation

We’ve discussed Orientation in an earlier Design 101 post, so check in here to learn why it’s important to know where the sun rises and sets in relation to your place. 

2.  Noise

Whether it’s the teenage drum champion next door or the birdsong from the trees up the road, it’s useful to understand the source of both welcome and unwelcome sounds. 

3.  Views and Privacy

Who can see you, and who can you see from different parts of your property?  Where are there great views? 

4.  Drainage

What happened in the last big downpour? Where did the water go? Did it flow freely and soak away quickly, or did it pond in one place for ages? 

Landscapology_Analysis7.jpg

5.  Access and movement

Are there some parts of your garden you never use (or maintain) because it’s just too hard to get there? What about the connections between important destinations, like the house or street?  Where do different types of movement intersect: vehicles, pedestrians, bicycles? How about fencing: are there fences and gates, and who or what are they protecting - kids in? cars out? pets in?

In our next Design 101 we will complete our Top 10 things to analyse on your site before starting design. We will spend more time in future posts looking at different ways you could respond to your findings. Everyone’s response will be different, but the important thing is to start with a clear understanding of what physical conditions you have to work with on your particular site.

Now it’s over to you.

Look at your garden (or house, or room, or park) again with fresh eyes, and quickly run through these first 5 points of analysis.  How many of these items are things you’ve always been aware of, without describing what you were doing as a site analysis?  How many other things have you just noticed, even though they were there all along.

Let me know in the comments section.

Of course, if you found this interesting and useful, why not double the fun and share it with a friend. 

Design Class: learning to love the scale

Have you ever had a designer ask what you think of the scale? Has it given you pause for concern, filling your mind with dread at the thought that last night’s seven course degustation with matching wine flight is already showing round your middle?

Fear not.

The type of scale we’re talking about here is nowhere near as scary as the ‘number-climbing-higher’ machines that we keep hidden in the bathroom so they don’t steal our will to live.

This type of scale should be treated with respect though, as it also has the ability to make you feel either very comfortable or very uncomfortable in a space.

Scale describes how something – a building, chair, tree, sculpture - sits in relation to its context. Something is called ‘out of scale’ when it’s perceived to be either too big or too small for its location, causing the overall effect to appear out of balance.

Let’s say you were considering adding a fountain of some sort to your courtyard garden, fed from recycled water you’d collected. Here’s your garden now…

...and here are two options for your fountain.

Option 1

...and Option 2:

Landscapology_Scale3.jpg

What do you think?

You might feel that the first fountain is ‘out of scale’ because it is too small, and barely draws attention to itself.

You might also feel that the second fountain is also ‘out of scale’, this time for being too big, overwhelming the space and threatening to drench you whenever you walk past.

The right scale fountain for your garden is probably somewhere in between the two.

What happens though, if you quite like the dramatic effect of that great big fountain?

Is it OK to play around with scale?

Sure, if that helps you create the effect you’re after.

Say you spend a lot of time reading in the garden and drinking cups of tea – it’s what you do to relax.

You might deliberately choose to have an over-size (‘out of scale’) garden chair to celebrate your favourite thing.

Scale is one of the many Spatial Qualities you have available to create the house, garden, park or city you love.

Once you start noticing the scale of different elements and spaces, you’ll feel clearer about what you consider to be 'in' or 'out' of scale, and can more confidently engage in the design process for your project.

Now it’s over to you.

Have you ever visited a place (maybe a garden or a park) and noticed that one or more elements was out of scale? How did this affect your experience and what do you think would have improved it?

Let me know in the comments section.

Of course, if you found this interesting and useful don’t forget to share with a friend, and I’ll see you soon for more Design 101.

Design Class: elephants never forget...and they can teach you how to read drawings

Have you ever had a designer invite you to go through some drawings? Has this given you pause for concern, worried that you’ll be confronted with a pile of papers full of squiggles and lines that make no sense whatsoever? 

Fear not.

This is actually a really common concern.  For some it can be worrying enough that they actually delay a much dreamed-about project.  Of course, your designer should be doing everything possible to guide you through, but it’s still important that you can read drawings with confidence.

Why?

You can make sure that everything you’ve discussed and agreed with your designer is incorporated.

You have a clearer idea of what the finished product will look like and how it will function.

You will feel more empowered and able to participate fully in the design process – after all, having your new house, garden or renovation designed should be an exciting and rewarding experience!

Today we’ll start right at the beginning, and look at the basic principles of reading drawings. And as this fear is often the elephant in the room at design meetings, we’ll use one of those lovely creatures as our life model for this session. 

Most projects will start with planning. Plans are the way designers make sure everything is in the right location and that everything will function properly.

Plans

Plans show what your project looks like from above.  A ground floor plan shows the building level closest to the ground, and it usually shows what’s happening about a metre above the actual ground level.  Our elephant pal Trunky’s ground floor plan would look something like this:

Buildings usually have a roof plan too. Imagine you were in a plane flying overhead. If you looked down, what would you see?  For our obliging friend it would be something like this:

Elevations

What about how the outside looks?  To describe that we use Elevations. Each elevation shows what the project looks like from a different side.  To describe Trunky we would use a front elevation,

a rear elevation,

and a side elevation:

Sections

The next thing to describe is how things are made, and how the different spaces work in three dimensions. To do this we use Sections. A section is like a slice through the building or garden.  Sections show things such as how the ground floor and upper floor work together; how stairs work; or how a swimming pool sits in the ground next to a terrace.

Let’s see what’s going on inside Trunky. If you imagined him sliced in half through from trunk to tail, and looked at the cut surface, you’d get a section something like this:

So there you have it.  You can apply this technique to reading any drawings, and it’s easy if you stop and remember that:

Plans show something from above;

Elevations show the surfaces of something from outside;

And Sections are slices through something to see how they fit together on the inside.

Of course, things can get more detailed (and potentially more confusing!) than this, and there are different types of drawings for different stages of a project, but these basic principles remain the same.

Now it’s over to you.  Have you ever been surprised with the way something has turned out on a project, because you weren’t 100% certain from the drawings how it was going to work?  What else would you like to know that would help you read drawings more confidently?

Let me know in the comments section.